
Post by Deleted on Sept 9, 2012 11:21:41 GMT 1
Ants are absolutely beautiful, fascinating creatures, and as a photographer I naturally wanted to take photos of them. Photos that could bring out the amazing world that they lived in.

But Macro Photography is difficult, and can be very expensive. Luckily, with a bit of research, I have found out ways to achieve budget photography on the "cheap". And when I say "cheap", I mean for a few hundred dollars instead of a few thousand! So it can still be an investment of sorts!
Since trying macro photography, I've learned a lot, and I've learned how to do it on a tight budget. I want to share this knowledge to any of you who may be interested in macro photography in future. You may all just learn from my mistakes!
The method I'm recommending- and what most macro photographers are probably already familiar with- is the use of macro extension tubes, placed onto a DSLR.
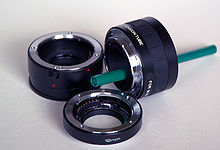
An example of a Macro Extension tube. (src: wikipedia)
The science behind extension tubes (explained more at www.shutterfreaks.com/Tips/ExtensionTube.htm) is that the further away a lens is from the sensor, the more macro is gets. So all macro extension tubes do is increase the distance between the lens and the DSLR camera body. Simple, and it can be effective. But most importantly, it is cheap!
When you look at the Wikipedia article for Ants, you probably notice some of the incredible photos. After looking at the users who took them, I found out they were using equipment in excess of $2000 (just for the LENS) to take the photos! The Macro extension tube may cost you $50, if you already have the camera and lens.
Firstly, you need a DSLR. I have a Canon 60D, which is a mid-range camera worth about $900 here in Australia, but you can get a Canon 1100D for around $400. They all take the same lenses.

A Camera like this, the Canon 1100D by itself is about $350. And it can be used for anything- not just macro photography! (src: DigitalRev.com)
Secondly, you need a lens. An apt lens is needed. Sports photography lenses are (ironically) good because they let you take photos from further away so you don't get attacked, but they aren't as zoomed in. For this, I purchased the cheap Canon 50mm prime lens. It is notorious for incredibly sharp images for its price, which is why I got it. The "Nifty Fifty" as it's called can be as low as $100- incredibly cheap for a lens, especially of this quality.

This is the Canon 50mm prime lens. The "Nifty Fifty" cannot zoom but has fantastic quality and a great macro potential- it'll make an an ant 1mm in size look like a truck!
Thirdly, you'll need a macro extension tube. There are some things you have to research when you purchase one- You need one that is the right model for you camera. Just searching for the same make as your DSLR should yield the right results. Also, you need ones that have autofocusing electronics inside. Don't get the cheap ones without electronics inside. It just doesn't work, because it leaves the aperture wide open on the lens, you will never get anything in focus. An extension tube with electronics between the camera and lens will allow for better depth of field and better focus.
Put them all together, and what does it look like?

Okay, so it looks a little Freudian, I'll admit. But it's not the size, it's how you use it, right? So have a look at a couple I've taken over the week:

The worm being eaten here is about 3mm in diameter. Imagine how small that makes the ants! And yet they look quite life-sized. The worm even looks like an enormous sausage!

The above image is one of the same ants dragging an attacking Green Ant (in the image at the top of this post). The Green Ants are usually 5mm in size.

This is a winged Green Ant male. He's a tiny little one, but he's easy to photograph cause all he does is relax on the perspex while the workers do all the labour!
So, there you have it, some examples that demonstrate what can be done with as little as $200 (if you have a DSLR already- around $600 if not.)
I'm not going to deny the reality- the photos on Wikipedia's "Ant" article are definitely better quality than these images. But the guys who did that paid literally ten times what you could have to pay for this.
Of course $200 may be a bit for some, but it's great compared to what the pros do.
Of course, extension tube macro photography has its disadvantages. For example, it lets less light into the camera, so you have to increase your sensitivity, which can make images grainy. But, for the price, I think it's worth it. And this may help you research macro photography first-hand for cheaper!
I hope this helped anyone with questions about macro photography!
But Macro Photography is difficult, and can be very expensive. Luckily, with a bit of research, I have found out ways to achieve budget photography on the "cheap". And when I say "cheap", I mean for a few hundred dollars instead of a few thousand! So it can still be an investment of sorts!
Since trying macro photography, I've learned a lot, and I've learned how to do it on a tight budget. I want to share this knowledge to any of you who may be interested in macro photography in future. You may all just learn from my mistakes!
The method I'm recommending- and what most macro photographers are probably already familiar with- is the use of macro extension tubes, placed onto a DSLR.
An example of a Macro Extension tube. (src: wikipedia)
The science behind extension tubes (explained more at www.shutterfreaks.com/Tips/ExtensionTube.htm) is that the further away a lens is from the sensor, the more macro is gets. So all macro extension tubes do is increase the distance between the lens and the DSLR camera body. Simple, and it can be effective. But most importantly, it is cheap!
When you look at the Wikipedia article for Ants, you probably notice some of the incredible photos. After looking at the users who took them, I found out they were using equipment in excess of $2000 (just for the LENS) to take the photos! The Macro extension tube may cost you $50, if you already have the camera and lens.
Firstly, you need a DSLR. I have a Canon 60D, which is a mid-range camera worth about $900 here in Australia, but you can get a Canon 1100D for around $400. They all take the same lenses.
A Camera like this, the Canon 1100D by itself is about $350. And it can be used for anything- not just macro photography! (src: DigitalRev.com)
Secondly, you need a lens. An apt lens is needed. Sports photography lenses are (ironically) good because they let you take photos from further away so you don't get attacked, but they aren't as zoomed in. For this, I purchased the cheap Canon 50mm prime lens. It is notorious for incredibly sharp images for its price, which is why I got it. The "Nifty Fifty" as it's called can be as low as $100- incredibly cheap for a lens, especially of this quality.
This is the Canon 50mm prime lens. The "Nifty Fifty" cannot zoom but has fantastic quality and a great macro potential- it'll make an an ant 1mm in size look like a truck!
Thirdly, you'll need a macro extension tube. There are some things you have to research when you purchase one- You need one that is the right model for you camera. Just searching for the same make as your DSLR should yield the right results. Also, you need ones that have autofocusing electronics inside. Don't get the cheap ones without electronics inside. It just doesn't work, because it leaves the aperture wide open on the lens, you will never get anything in focus. An extension tube with electronics between the camera and lens will allow for better depth of field and better focus.
Put them all together, and what does it look like?
Okay, so it looks a little Freudian, I'll admit. But it's not the size, it's how you use it, right? So have a look at a couple I've taken over the week:
The worm being eaten here is about 3mm in diameter. Imagine how small that makes the ants! And yet they look quite life-sized. The worm even looks like an enormous sausage!
The above image is one of the same ants dragging an attacking Green Ant (in the image at the top of this post). The Green Ants are usually 5mm in size.
This is a winged Green Ant male. He's a tiny little one, but he's easy to photograph cause all he does is relax on the perspex while the workers do all the labour!
So, there you have it, some examples that demonstrate what can be done with as little as $200 (if you have a DSLR already- around $600 if not.)
I'm not going to deny the reality- the photos on Wikipedia's "Ant" article are definitely better quality than these images. But the guys who did that paid literally ten times what you could have to pay for this.
Of course $200 may be a bit for some, but it's great compared to what the pros do.
Of course, extension tube macro photography has its disadvantages. For example, it lets less light into the camera, so you have to increase your sensitivity, which can make images grainy. But, for the price, I think it's worth it. And this may help you research macro photography first-hand for cheaper!
I hope this helped anyone with questions about macro photography!


